Rawtherapee interface complexity

Most of my time i 'm using the RawTherapee conversion tool to convert from RAW photos produced from my Nikon D3200 to jpg. RawTherapee is a cross-platform and it is released under the GNU General Public License Version 3 from January 2010. During the years the application attracted many programmers and photographers. It is really a powerful tool, how something it started to bothering me after checked the latest version. First lets see what Lightroom offers to the photographer:
Lightroom toolbar, screenshot taken from Lightroom Fanatic.
There are some interesting names that needs more explaining, such as how the shadows and highlights bars work or what is clarity, but nothing extreme complicated. Now lets see what RawTherapee offers:

Toolbar of RawTherapee for the Exposure settings.
This is the first thing that the user edits.

It offers an "Auto Levels" that automatic expands the histogram based on the % of clipped pixels. And then there are bars, a lot of bars. Exposure exists also in Lightroom, but then there is the Highlights and the Highlights compression threshold, that does not exist in Light room. The same for the Shadows, but there is not threshold here. Then there is the Lightness, but again no threshold here. Saturation is ok, although i would expect in different tab. Then you also have two (!) tone curves to play. The option that does not exists in rawtherapee is the clarity. It is called local contrast and it is in different tab. Lets see:
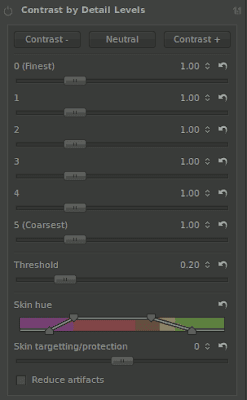
Options of contrast by detail levels in rawtherapee.
Options of contrast by detail levels in rawtherapee. 
More options and it seems ok, not so complicated. However, there is a new tab called wavelet levels that it is essentially the same, but with much more options:
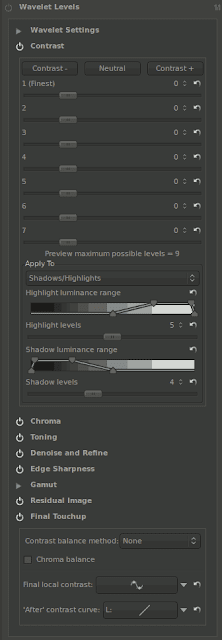
Wavelet levels RawTherapee.

Yes there is a lot of documentation, but the available settings are better suited for the research scientist rather to the simple photographer or user.

Popular posts from this blog

Static linking with gcc and g++

In this tutorial, we will explain what the static linking is, how this affect the size of final binary, and why statically linking with g++ sometimes is pain. By definition, a statically compiled binary is a group of programmer ‘s routines, external functions, and variables which are packed into the final binary executable. The compiler or the linker produces the final object and embeds all the functions and variables and the linking phase.  There are two reasons of using dynamic linking and shared libraries: 1) Avoid creating a huge binary, if all the programs use a standard set of libraries why not having the operating system providing to them 2) Compatibility on operating system and machine dependant characteristics: sometimes the libraries must be implemented based on the architecture or the operating system and using dynamic linking is an easy way to avoid this catch. On the other hand, static linking is the ideal way of distributing one software product, pay...

Processing Milky Way in RawTherapee

This text is an analysis of a video I did some months ago how to process photos of our Milky Way in RawTherapee. You can find the picture here . The photo was taken by wiegemalt. This work is licensed under a Creative Commons Attribution-NonCommercial-ShareAlike 4.0 International License. Editing: Step 1: Fixing lighting The first thing someone notices when opening the picture is the extreme noise due to high ISO used (1600 - check the picture on the right). The first thought is to de-noise the picture, however, if you do that you are going to loose the details of the night sky. The main reason for the high noise is the additional exposure Rawtherapee adds when the 'Auto' button is pressed. In particular, the RT adds +2.4 EV to equalize the picture. This is Wrong! What we want is to keep the noise down and at the same time bring the stars up. That's why we are going to play with the Tone Curve of the RT. To adjust the light properly we increase the cont...

Auto - Vectorization with little help from GCC!

This tutorial helps the programmers to benefit the progress of the auto-vectorization algorithms that are implemented in modern compilers, such as gcc. Before you start playing with the vectorization of your code i assume that you don't have any bottleneck in you code (like dynamic memory allocation etc) in the critical path. In this tutorial we will use the gcc 4.4.1, but the same steps can be applied to newer or older versions.  First of all there are two issues with auto vectorization:  1) gcc must know the architecture (eg what SIMD instructions are available)  2) The data structures must by properly aligned in memory The first step is to find the architecture of your processor and point it to gcc using the flags -mtune=... / -march=... you specify the architecture.  For example, my laptop is core2Duo so i put -march=core2. You can find more more information  here .  The next problem we must solve is knowledge of memory alignment. ...